Teleprompter setup for a home desk
Mount the camera and screen in the right place, light your face without glare, and tidy the cables. Most desks need no new gear at all.
Open the app · FreeSee pricing
- Mounting
- Lighting
- Cables
- Budget tiers
Quick answer
The cheapest home teleprompter is the laptop or monitor you already have: put the camera at eye level, run the script in a narrow window right under it, and light your face from the front. Most desks need no new gear. If you buy anything, buy in this order: a light, a microphone, then a camera.
- Camera
- At eye level, top centre
- Script
- Narrow window under the lens
- Light
- One soft light in front
- Upgrade order
- Light, mic, camera
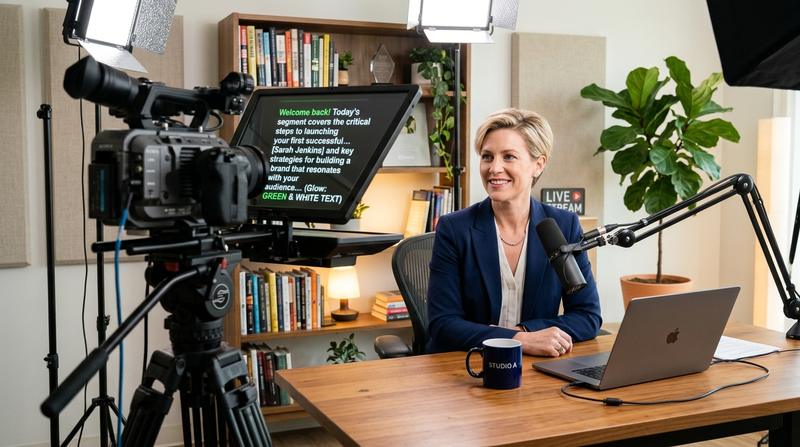
Home studio
A studio setup on the desk you already have.
Raise the camera to eye level, put the script right under it, and light your face from the front. Most desks need no new gear: a stack of books, a window and a free browser teleprompter get you most of the way.
Start with mountingA desk setup in three steps
Camera at eye level
Raise the camera to the height of your eyes, about an arm's length away. Stack books under a laptop if you have to.
Script under the lens
Put the script directly under the camera, with the line you read near the top, so your eyes stay close to the lens.
Light from the front
One soft light in front of you, slightly above eye level. Turn off or dim the light behind you.
Our take, worked out
One rule, one number worked out for this setup, and what we would not spend money or time on.
The rule
The one-screen rule
The script goes on the screen that holds the camera, never on the screen next to it. A second monitor feels natural while you set up and looks like a glance away on every take.
Worked out
18×
A script on a side monitor 40 cm off to one side, read from 65 cm, puts your eyes at about 31.6°. The same script 2 cm under the webcam is 1.8°. That is roughly eighteen times the angle for the same words.
What we would skip
- A ring light if you wear glasses. It puts a bright circle in each lens; one soft light off to the side does not.
- A 4K webcam before a light. A cheap webcam with good light beats an expensive one in a dim room.
- A glass teleprompter rig just for video calls. A narrow window under the webcam already gets you under 2°.
5 topics
Mounting the camera and screen
Where the camera and the script sit decides whether you look at your viewers or at your notes.
01What is the cheapest teleprompter setup?02Monitor with a webcam03Phone under the camera04Camera on a tripod or arm05How far should I sit from the camera?Read the full guideShow less
What is the cheapest teleprompter setup? #
A laptop on its own: put ScrollCue in a narrow window right under the built-in camera. No extra gear.
Raise the laptop so the webcam is at eye level: a laptop stand, a box or a stack of books. Open ScrollCue in a narrow window right under the webcam, with the cue lineCue line. A fixed marker near the top of the prompter that shows which line to read. Keeping it close to the lens keeps your eyes close to the camera. near the top. Use an external keyboard and mouse if the laptop is now too high to type on. On a MacBook, the script sits right under the notch; see the MacBook guide.
Monitor with a webcam #
Webcam on top, script just below.
Clip the webcam to the top centre of the monitor you face. Put ScrollCue at the top centre of that monitor, directly under the webcam. If you use two monitors, the camera and the script go on the same one; looking at a side monitor shows on camera as looking away.
Phone under the camera #
A second screen for a busy desktop.
If your screen is full with the call or your editing app, run ScrollCue on a phone clamped directly below the camera. A small phone clamp on a desk arm or a tripod with a cold-shoe mount holds it steady. Add ScrollCue to the phone's home screen so it opens full screen. See the iPhone and Android guides.
Camera on a tripod or arm #
Mirrorless, DSLR or phone camera.
For a real camera, a desk arm or small tripod behind the monitor puts the lens just above the screen. For the cleanest eye line, put a glass teleprompter rig on the lens and run ScrollCue with Mirror on; see hardware teleprompters or build one with the DIY glass guide.
How far should I sit from the camera? #
About an arm's length, with the lens at eye level.
Sit about an arm's length from the camera, with the lens level with your eyes. A lens below your eyes looks up your nose; above them, you look small and tilted. Sitting a little farther back with bigger text also makes eye movement harder to see.
4 topics
Lighting that avoids glare
Good light matters more than an expensive camera. One light in the right place is enough.
01Where should I put the light for video?02How do I stop glare in my glasses on camera?03Behind you04ColourRead the full guideShow less
Where should I put the light for video? #
In front of you, slightly above eye level and a little to one side.
Place one soft light in front of you, a little above eye level and slightly off to one side, about 30 to 45 degrees. It lights your face evenly with a gentle shadow that gives shape. A window works too: face it rather than sitting with it behind you.
How do I stop glare in my glasses on camera? #
Move the light higher and further to the side, so its reflection misses the lenses.
If you wear glasses, raise the light and move it farther to the side until its reflection leaves your lenses. Lower the brightness of the script screen too, and use white or yellow text on a black background, which lights your face far less than a bright white page.
Behind you #
Darker than your face.
Turn off overhead lights behind you and keep the background a little darker than your face. A bright window behind you turns you into a silhouette and makes the camera darken the whole image.
Colour #
Match your lights.
Use bulbs of the same colour temperature, all warm or all daylight. Mixing a warm desk lamp with daylight from a window gives your face two colours that are hard to fix later.
3 topics
Cables and power
A tidy desk is faster to set up and safer for a camera on an arm.
01Camera and webcam connections02Power for long sessions03Keep cables out of the shotRead the full guideShow less
Camera and webcam connections #
Direct ports, not hubs.
Plug a webcam straight into the computer rather than a hub or monitor, especially cameras that need USB 3, such as the Elgato Facecam. If a camera stops appearing, see the Camera Hub fix guide.
Power for long sessions #
Plug in the phone and the laptop.
A phone running the camera and a bright screen drains fast. Plug in the phone and the laptop for anything longer than a short take. ScrollCue keeps the screen awake while it scrolls, so a charger matters more than the battery.
Keep cables out of the shot #
Route along the arm and under the desk.
Run cables along the back of the monitor arm or tripod leg and clip them under the desk edge. Leave a little slack at the camera so moving the arm does not pull the cable out mid-recording.
Three budgets, one free app
Start with what you have. Upgrade light and sound before the camera.
| Tier | Camera | Script | Light | Sound |
|---|---|---|---|---|
| Free | Laptop webcam on a stack of books | ScrollCue window under the webcam | Face a window | Laptop mic, quiet room |
| Low cost | External webcam at eye level | ScrollCue under the webcam or on a phone | One small LED panel | Clip-on lavalier mic |
| Upgraded | Mirrorless camera on a desk arm | Glass rig with a tablet, Mirror on | Key light with a soft diffuser | USB or XLR microphone on an arm |
3 topics
Habits that save every take
The setup is half of it. These make the delivery look natural.
01Check the frame before you start02Short lines, slow scroll03Record a test takeRead the full guideShow less
Check the frame before you start #
Eyes on the upper third.
Look at your preview once: your eyes should sit about a third of the way down the frame, with a little space above your head. Then hide the preview so you look at the lens, not at yourself.
Short lines, slow scroll #
Narrow column, slightly slow speed.
Use a narrow column so each line holds five to eight words, and set the scroll slightly slower than feels natural. Pause and look up at the end of sentences. The on-camera tips go further.
Record a test take #
Ten seconds saves an hour.
Record ten seconds and play it back with sound. Check the eye line, the light on your glasses and the audio before you record the real thing.
3 topics
Choose your gear
Camera, microphone and background, compared for a desk.
01Webcam, phone or camera?02Microphone placement03Background and room soundRead the full guideShow less
Webcam, phone or camera? #
What each one gives you.
| Camera | Strengths | Teleprompter setup |
|---|---|---|
| Laptop webcam | Free, always there | ScrollCue strip under the webcam |
| External webcam | Better image, mounts at eye level | Strip under the webcam on your main monitor |
| Phone back camera | Very good image you already own | Second device under the phone, or a glass rig |
| Mirrorless or DSLR | Best image, soft background | Glass rig with a tablet, Mirror on |
Microphone placement #
Close beats expensive.
Keep the microphone as close to your mouth as the shot allows: a lavalier clipped to your shirt, or a desk mic on an arm just out of frame. A cheap mic close to you sounds better than an expensive one across the desk, because it picks up less of the room.
Background and room sound #
Soft surfaces, simple background.
Sit a few metres in front of a simple background: a bookshelf, a plant, a plain wall with one light on it. Bare walls and hard floors echo; a rug, curtains or a sofa behind the camera absorb a lot of it. Turn off fans and close the window before you record.
4 topics
Small spaces and long sessions
Setups for a shared table or a tiny room, and comfort for long recording days.
01Shared table or kitchen counter02Small room or dorm03Ergonomics for long sessions04Standing desk or sitting?Read the full guideShow less
Small room or dorm #
Use the corner.
Sit facing into the room with your back to a corner or wall, so the camera sees depth rather than a flat wall. Put the light on the side of the desk away from the window, and the script directly under the camera.
Ergonomics for long sessions #
Screen at eye level, breaks every hour.
Raising the camera to eye level also raises the script, which helps your neck. Sit back in a supportive chair, keep water nearby, and take a short break every hour. Split long scripts into sections and record them one at a time.
Standing desk or sitting? #
Move the camera with you.
On a standing desk, mount the camera and the script on the desk itself, so both rise and fall together and stay at eye level. A monitor arm that holds the webcam above the screen keeps the eye line right in both positions.
3 topics
Setups that just work
Copy one of these and adjust it to your desk.
01Lighting by time of day02Cable list for a desk setup03Your first recording in ten minutesRead the full guideShow less
Lighting by time of day #
Daylight changes; plan for it.
- Morning or daytime: face the window, with a sheer curtain to soften direct sun. Turn off warm room lights so colours match.
- Evening: one soft LED light in front and slightly to the side, set to a warm or neutral colour, with a small lamp behind you for depth.
- Changing weather: close the curtain and rely on your own light, so the image stays the same from take to take.
Cable list for a desk setup #
What to have ready.
- USB cable for the webcam, rated for data, plugged straight into the computer.
- Charger and long cable for the phone or tablet running the script.
- Power for the light, ideally on the same power strip as the computer.
- Cable ties or clips to run everything down the arm and under the desk.
Your first recording in ten minutes #
A plan you can follow today.
- Raise the camera to eye level and put ScrollCue right under it.
- Paste a short script, about 150 words, which is roughly one minute.
- Face the window or turn on one light in front of you.
- Record a ten-second test, watch it with sound, and fix one thing.
- Record the full minute. Then do it again and keep the better take.
3 topics
Desk setup troubleshooting
The problems people hit most at home, and the quick fix for each.
01I look like I'm reading02My face is too dark or too orange03There is an echoRead the full guideShow less
I look like I'm reading #
Move the text closer to the lens.
Put the cue line at the top, the window right under the camera, and the column narrow. Sit a little farther back with bigger text. The on-camera tips go further.
My face is too dark or too orange #
Light and colour.
Add light in front of you and turn off lights behind you. If you look orange, a warm bulb is mixing with daylight: use one colour of light. Set the camera's white balance by hand if it keeps shifting.
There is an echo #
Soften the room.
Move the microphone closer, add soft things to the room (a rug, curtains, a blanket over a chair behind the camera) and turn off fans. Closeness matters more than any setting.
13 questions
Questions, answered
Short answers to what people ask before they press play.
01What is the cheapest teleprompter setup at home?02Where should the teleprompter go on my desk?03How do I stop glare on my glasses?04Do I need a glass teleprompter at home?05What should I upgrade first?06What is the best light for a home teleprompter setup?Read all answers · 7 more answersShow less
What is the cheapest teleprompter setup at home? #
Raise your laptop so the webcam is at eye level and run ScrollCue in a narrow window right under it. It costs nothing and keeps your eyes close to the lens.
Where should the teleprompter go on my desk? #
Directly under the camera lens, with the line you read near the top of the screen. If the camera is on a monitor, the script goes on that same monitor.
How do I stop glare on my glasses? #
Raise your light and move it farther to the side, lower the screen brightness, and use light text on a black background.
Do I need a glass teleprompter at home? #
No. A screen right under the webcam works for calls and most videos. A glass rig gives the cleanest eye line for a camera on a tripod.
What should I upgrade first? #
Light, then the microphone, then the camera. Viewers forgive a soft image far more easily than bad sound or a dark face.
What is the best light for a home teleprompter setup? #
One soft light in front of you, slightly above eye level and to one side, or a window you face. Keep the area behind you darker than your face.
Do I need a separate microphone? #
A separate microphone is the best first upgrade. A clip-on lavalier or a desk mic close to your mouth sounds far better than a laptop's built-in mic.
How high should my camera be? #
Level with your eyes, about an arm's length away. Stack books under a laptop if needed.
Can I use a TV as my teleprompter at home? #
Yes, for a camera on a tripod in front of it. Put the camera as close to the top centre of the TV as you can and read from the top of the screen.
Can I use my phone as both camera and teleprompter? #
Yes. Press record and the camera shows behind the script (free in 720p, 1080p on Pro). For the best image, record on the phone's back camera and read from a second device under it.
Do I need a ring light? #
No. A ring light works, but any soft light in front of you and slightly to one side does the job, and is less likely to reflect in glasses.
Where should my key light go if I wear glasses? #
Higher and farther to the side than usual, so its reflection leaves your lenses. Tilt the glasses slightly down if a reflection remains.
Should the script be on the same monitor as my webcam? #
Yes. The script belongs directly under the camera you look into. Reading from a side monitor shows on camera as looking away, however close it is.